Do you want to know how to add location on Instagram bio?
You’ve probably already seen Instagram bios where people have included their locations.
For example, “London, UK” or “Houston, Texas”.
In this article, we’re going to show you how to do this on Instagram so that you can show your location in your Instagram bio as well.
How To Add Location On Instagram Bio

To add location on Instagram bio, firstly, switch to a business account. Now, go to your Instagram profile and tap the “Edit Profile” button. Scroll down and tap the “Contact options” field, and then tap “Business address”. Finally, add your location, tap on “Done” and then on “Save”.
Note: If you don’t see the location after completing these steps, turn on the “Display contact info” toggle switch. Tap the profile icon > tap the “Edit Profile” button > select “Profile display” > enable the “Display contact info” switch > tap “Done”.
Here’s how to add location on Instagram bio:
- Switch to a Business account
- Tap the profile icon
- Tap the “Edit Profile” button
- Select “Contact options”
- Tap on the “Business address” field
- Enter location and tap “Done”
- Tap “Save”
1. Switch to a Business account
If you already have a “Business” account, skip this step.
To begin with, you must have a “Business” account because “Personal” accounts do not have the option to add a location to their bio.
You can, however, enter your location as text in your bio. However, this is not the correct approach to adding your location to your bio.
Also read: How To See Who Shared Your Instagram Post
You can only add 150 characters to your Instagram bio, and if you enter your location as text, you’ll have less space to add your actual Instagram bio.
So, switching to a Business account and then adding the location in the “Business address” field is a better option.
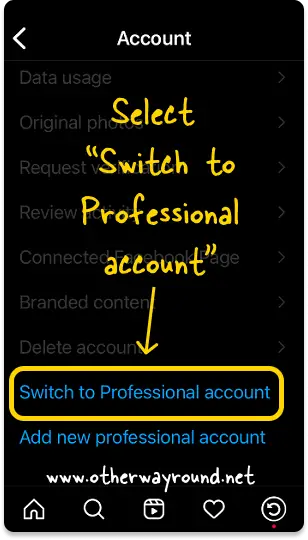
To switch to a business account on Instagram:
- Tap the profile account
- Tap on the “Menu” icon
- Select “Settings”
- Select “Account”
- Scroll down and select “Switch to Professional account”
- Keep tapping on the “Continue” button
- Select a category (For example, Blogger)
- Select “Business” and tap “Next”

You must select the “Business” option because the “Creator” account does not allow you to add a location.
If you have a “Creator” account on Instagram, you must change it to a “Business” account.
Unfortunately, you cannot add a location on your Instagram bio if you have a Creator account. You’ll need to switch to a Business account.
After you’ve created a “Business” account, it’s time to add the location; continue reading to learn how to put a location on your Instagram bio.
2. Tap the profile icon

It is best to close and restart the Instagram app after switching to a “Business” account.
After you reopen the Instagram app, tap the profile icon in the bottom right corner.
The bottom menu contains five options: Home, Search, Reels, Notifications, and Profile.
Your profile photo can be found on the far right side of the menu bar. Tap this icon to open your Instagram profile page.
Also read: The Best Instagram Captions
3. Tap the “Edit Profile” button
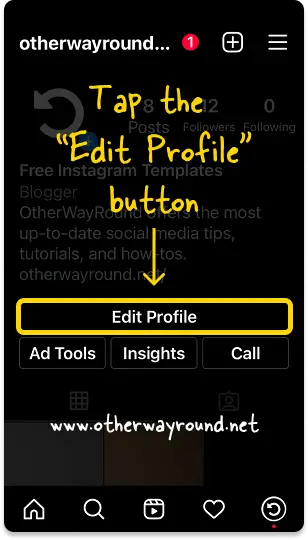
When you access your Instagram profile page, you’ll notice four buttons below your Instagram bio: Edit Profile, Ad Tools, Insights, and Call.
To view the profile options, tap the “Edit Profile” button.
4. Select “Contact options”
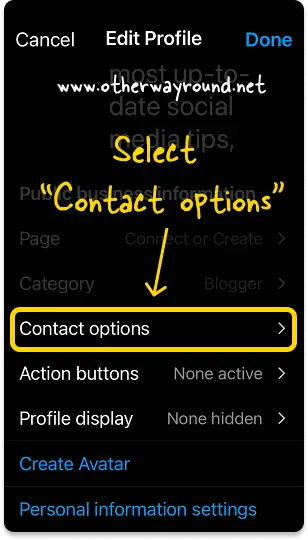
You can edit your profile photo, name, username, and bio on the “Edit Profile” page.
You can also add your website’s URL.
Also read: How To Post Better Quality Videos On Instagram
And, because you have a Business account, you can see the “Public business information” option.
This section contains five settings: Page, Category, Contact options, Action buttons, and Profile display.
Select “Contact options” from the list of options and proceed to the next step.
5. Tap on the “Business address” field
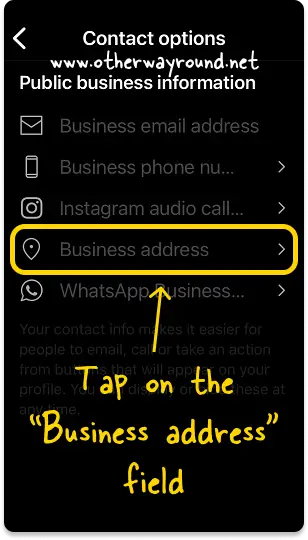
The “Contact options” section contains five fields: Business email address, Business phone number, Instagram audio calling, Business address, and WhatsApp Business action button.
If you own a business and want to include your contact information, you can include your business email, phone number, and other information.
However, if this is a personal account, there is no need to enter your phone number or email address. All of these fields are optional.
To add a location, tap the “Business address” field.
6. Enter location and tap “Done”
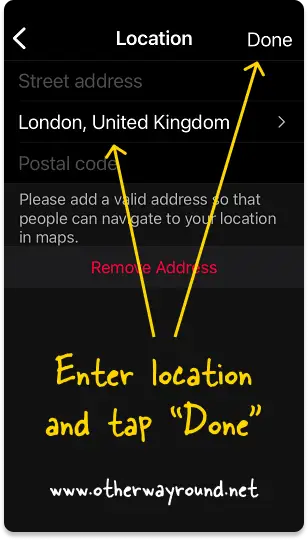
There are three fields on the “Location” page: street address, city/town, and postal code. It is recommended that you fill out all three fields if this is a business account.
If this is your personal account, I recommend simply entering your city or town. Entering your street address and postal code is pointless if you have a personal account.
If you operate a business and want to show your business location (office or shop), you should fill in all three pieces of data so that your customers can easily locate your business.
To enter your street address, tap the “Street address” field and start typing your street address; to enter your city, tap the “City/Town” field and begin typing your city name (for example, London) and select the relevant place from the suggestions.
If you want to enter your postal code, tap the “Postal code” section and begin typing it.
After you’ve entered your location, tap “Done”.
7. Tap “Save”
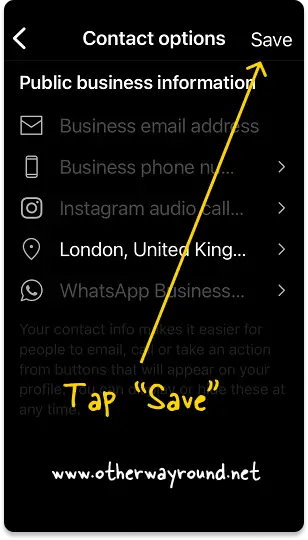
To save the entered location, tap “Save”.
Your entered location will now be shown in the Instagram bio.
If you still don’t see it, go to your Instagram profile and tap the “Edit Profile” button. Select the “Profile display” option and turn on the “Display contact info” toggle switch.
Congratulations! You have successfully learned how to add location on Instagram bio.
How To Remove Location From Instagram Business Profile?
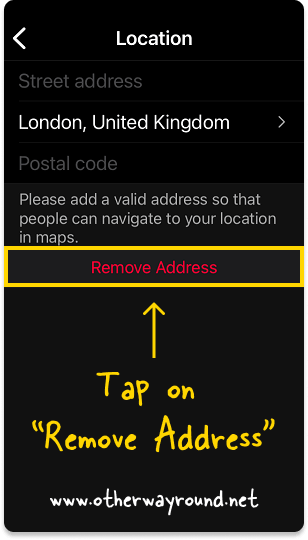
To remove location from Instagram business profile, tap the “Profile” icon, then tap the “Edit Profile” button, select “Contact options”, tap the address, and finally tap the “Remove Address” button.
How To Add Location On Instagram Bio Creator Account?
Unfortunately, you cannot add location on Instagram bio if you have a Creator account. You’ll need to switch to a Business account.
To switch from a “Creator” account to a “Business” account on Instagram:
- Tap the profile icon
- Tap the “Menu” icon
- Select “Settings”
- Select “Account”
- Select “Switch account type”
- Select “Switch to Business account”
After you switch to a Business account, tap the Edit Profile button > select Contact options > Select Contact options > tap the Business address field > enter location > Done > Save.
How To Add City In Instagram Bio?
To add city in Instagram bio, switch to Instagram Business account, then tap the profile icon and then the “Edit Profile” button. Select the “Contact options” and then the “Business address” field. Finally, enter your city into the “City/Town” area. Don’t forget to save your changes.
How To Add Location Pin On Instagram Bio?
To add location pin on Instagram bio, switch to a Business account, then tap the profile icon from the bottom menu. Now, tap the “Edit Profile” button. From the list of options, select the “Contact options” and then the “Business address” field. Finally, tap the “Postal Code” area and enter your location pin. Tap “Done” and then on “Save” to save your changes.
Conclusion
Many Instagram users are unable to find the option to include their location in their Instagram bio.
However, adding your location is not yet available for personal accounts.
You must switch to a business account.
You can easily add a location to your Instagram bio by following these simple steps:
- Switch to a business account
- Tap the profile icon
- Tap the “Edit Profile” button
- Select “Contact options”
- Tap on the “Business address” field
- Enter the location and tap “Done”
- Tap “Save”