Are you wondering how to confirm taxpayer status on PayPal?
PayPal sends an email if they want to confirm your taxpayer status.
PayPal may restrict the ability to send or receive money if you do not confirm your taxpayer status.
This article explains what “Confirm Taxpayer Status” means on PayPal and how to do so in five simple steps.
- Why Do I Have To Confirm My Taxpayer Status On Paypal?
- Paypal Confirm Taxpayer Status Email
- How To Confirm Taxpayer Status On Paypal?
- What Is My Tax Identification Number?
- What Happens If I Don’t Provide PayPal With My Taxpayer ID Number?
Why Do I Have To Confirm My Taxpayer Status On Paypal?

Because you have crossed the threshold of $600 USD in total during the course of the year, you have to confirm your taxpayer status on PayPal.
The new law is a result of President Joe Biden’s American Rescue Plan, which revised tax reporting rules for third-party payment networks like PayPal.
So, if your PayPal transactions exceed $600 USD, you will be asked to confirm your taxpayer status.
Note: If you are not a US citizen and do not operate a business in the US, you must declare that you are not subject to US income tax.
Paypal Confirm Taxpayer Status Email
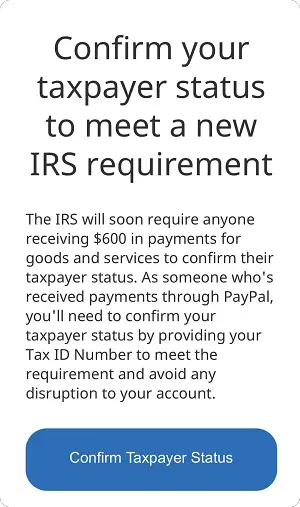
PayPal is required to report to the IRS information regarding account holders who receive payments in excess of $600 USD. As a result, you will be prompted to verify your taxpayer status by giving your SSN or ITIN. PayPal will send you an email reminder.
This is what the reminder email looks like:

How To Confirm Taxpayer Status On Paypal?
To confirm taxpayer status on PayPal, open the email, click on the “Take Action Now” button and log in to your account. Now, select your taxpayer ID type, enter your first and last names, and enter your complete taxpayer ID. Finally, click the “Submit” button.
Here’s how to confirm your taxpayer status on PayPal:
- Click the “Take Action Now” button and log in
- Select your taxpayer ID type
- Enter your first and last names
- Enter your complete taxpayer ID number
- Click the “Submit” button
1. Click the “Take Action Now” button and log in
The first step is to open the reminder email from PayPal.
Whenever PayPal wants you to confirm your taxpayer status, you’ll get a reminder email from PayPal.
So, the first step is to open the email that you received from PayPal.
In that email, you’ll see a button that says “Take Action Now”.
Sometimes, you may see the “Confirm Taxpayer Status” button.
Now, click the button and log in to your PayPal account.
If you are not able to find the email, simply go to PayPal.com and log in to your account. Now, click the bell icon located at the top right to view the notifications. Scroll down to the “Confirm your taxpayer status” notification and click the “Confirm Status Now” button.
2. Select your taxpayer ID type
After you click the “Confirm Status Now” button, you’ll see the “Confirm your U.S. taxpayer status” page.
On this page, you’ll see a form asking you to select your taxpayer ID type.
Select “SSN” (Social Security Number) if you are a citizen of the US.
Or select “ITIN” (Individual Taxpayer Identification Number).
3. Enter your first and last names
Now, you’ll see the complete form.
Enter your first name in the “First name” field (for example, Elon).
In the “Last name” field, enter your surname (for example, Musk).
4. Enter your complete taxpayer ID number
After entering your full name, enter your 9-digit tax ID number.
What Is My Tax Identification Number?
A Tax Identification Number (TIN) is a unique nine-digit number used by the IRS to identify and track your tax returns.
You can use any one of the following numbers as your Tax Identification Number:
- Social Security Number (SSN)
- Employer Identification Number (EIN)
- Individual Taxpayer Identification Number (ITIN)
- Taxpayer Identification Number for Pending U.S. Adoptions (ATIN)
- Preparer Taxpayer Identification Number (PTIN)
5. Click the “Submit” button
After filling out all of the information, simply click the “Submit” button to submit the form.
After you complete the form, the entered information will be verified against IRS data to ensure that it is correct.
If your entered data does not match the IRS’s data, you will be given three more chances to fix it.
If the data does not match after the third try, PayPal will request your address and details to be verified.
Please keep in mind that if you have numerous PayPal accounts, you must confirm your taxpayer status on each one.
What Happens If I Don’t Provide PayPal With My Taxpayer ID Number?
PayPal may restrict your actions on the platform if you do not provide your taxpayer ID number. PayPal may restrict you from sending or receiving money. It may also restrict you from making changes to your entered account information, such as updating your credit card number or bank account number.
Conclusion
PayPal is required to report information about account holders who receive payments in excess of $600 USD to the IRS.
As a result, you’ll be prompted to validate your taxpayer status by providing your SSN or ITIN.
You can follow these simple steps to confirm your taxpayer status on PayPal:
Step 1: Click the “Take Action Now” button and log in
Step 2: Select your taxpayer ID type
Step 3: Enter your first and last names
Step 4: Enter your complete taxpayer ID number
Step 5: Click the “Submit” button


